Dressmaker Guide: Sewing Tips and Pattern Advice
Last updated . Dressmaker is a fan-made guide and is not affiliated with the developers.
Most dresses in Dressmaker are lost before the sewing machine is switched on. Where each pattern piece lands on the cloth, and which way the grain runs through it, is what your customer sees at the end.
This page covers the practical half of the craft: grain and bias, print scale, fabric per panel, layout planning, seam order and trim discipline. New to the dressmaker game? Start with how to play Dressmaker.
Grain, Bias and When a Diagonal Cut Pays Off
Lengthwise grain runs parallel to the selvedge, the finished edge of the bolt, and cloth stretches least in that direction. That is why it is the default for anything that must hold a shape: a bodice, a waistband, a straight skirt.
Cut at 45 degrees to both grain lines and you are on the bias, where cloth stretches, ripples and drapes. Grain-aligned panels hang square and keep their seams where you put them, so align by default. Mixing the two is the real mistake: a bias panel beside a straight-grain one behaves like a different fabric at the seam.
When bias is worth it
Bias earns its place when the silhouette is simple, the fabric is fluid, and the print does not care about direction. It is a poor choice for stripes and plaids, where matching a bias seam is nearly impossible, and for large directional prints that march diagonally up the dress.
The official Steam description puts it plainly: "Whether your pattern is aligned to the grain or cut on bias, how you choose to arrange and cut out your fabric is what appears on the final dress."
Print Scale vs Pattern Piece Size
A print needs room. If the repeat is wider than the piece you cut it from, that piece captures a fragment — one petal, half a stem — and reads on the mannequin as a stain. Keep a piece to one full repeat, and save the big repeat for the skirt.
- Stripes have to meet at the seam. A band that steps up or down by a fraction of its width is instantly visible.
- Plaid matches in two directions, which costs cloth as well as patience: place pieces to suit the repeat, not the layout.
- Mirrored pieces make a chevron. Deliberate at a center back seam, a mistake at a side seam.
Fabric Choice, Panel by Panel
Dressmaker lets you "take full control over what fabric to use for each panel of your garment," which is the quickest way to make a dress look expensive or homemade. A crisp cotton bodice over a fluid silk skirt is a contrast you chose; two mid-weight fabrics with different drape is an accident.
A skirt hangs the way its cloth tells it to. Wool and velvet fall in a dense, straight line; silk and fine cotton float. In a real workroom you would add a hem weight to make light cloth behave heavier. The developers have not published fabric stats, so the mannequin is your measurement.
Velvet has a nap: the same cloth looks lighter one way and darker the other, so two panels cut in opposite directions give one dress two colors. Silk is the opposite problem, fluid and honest about every pucker.
| Fabric | How it behaves | Best for | Watch out for |
|---|---|---|---|
| Cotton | Holds a line, easy to handle | Everyday dresses, bodices | Flat on a full skirt |
| Linen | Crisp, visible weave | Summer dresses, relaxed shapes | Fights a busy print |
| Wool | Dense, hangs heavy | Tailored shapes, winter skirts | Rigid under a soft silhouette |
| Silk | Fluid, holds nothing | Bias cuts, soft skirts | Shows every pucker |
| Velvet | Deep color, adds weight | Statement dresses | Reverse-cut panels read as two colors |
Planning the Layout Before You Cut
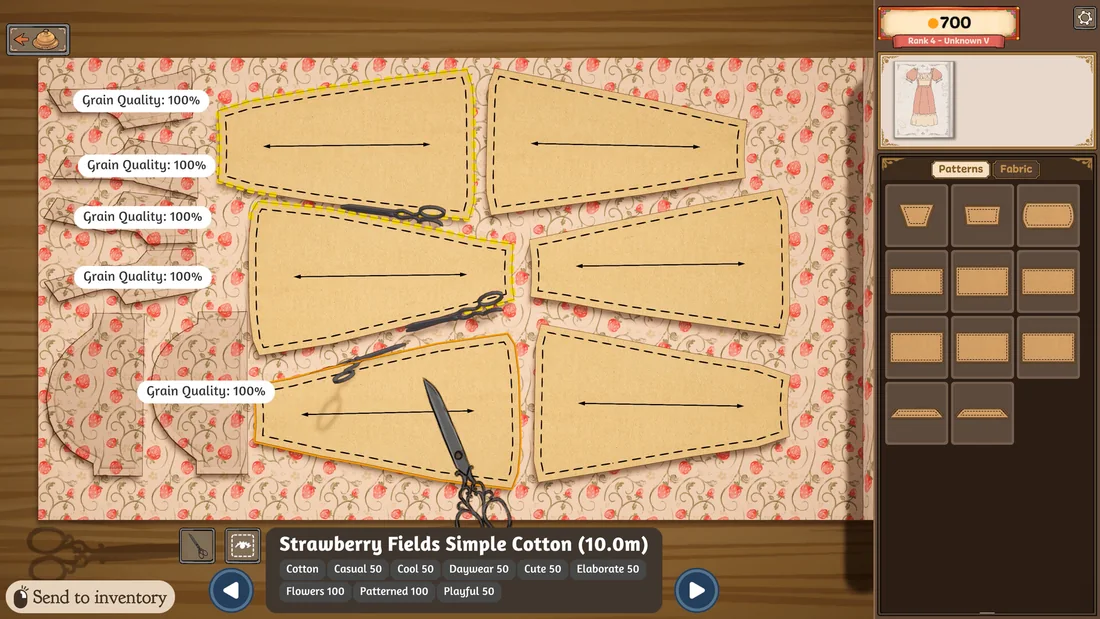
Nothing later repairs a bad layout. Once the shears are through the cloth, that fabric is spent, so plan the whole table before you place the first piece.
- Tile it in your head first. Big pieces — skirt, back, sleeves — then fit the small ones into the gaps they leave.
- Decide what you are optimizing for. Minimum waste and clean repeat placement are different layouts; wasting an inch to buy a matched seam is worth it.
- Stay off the selvedge. It carries the maker's printing and often a different shade.
- Keep direction consistent. A one-way print or a nap means every piece faces the same way.
- Keep every offcut. Scraps are the cheapest practice material you will ever have.
Seam Order: Keep the Work Flat and the Inside Clean
The order you sew in decides how much fiddly work happens on a flat panel versus a finished garment. Build small pieces into big ones while everything is flat, close the shoulders and side seams to turn two panels into a tube, set the sleeves while the body is open, and finish hems and openings last.
Two habits fall out of that. Do flat work flat: buttons, bows and appliqué are easier to place on a panel lying on the table. And alignment beats speed, because two sewn panels are one piece. The machine has an infinite bobbin, so nothing runs out mid-seam.
Decoration Discipline
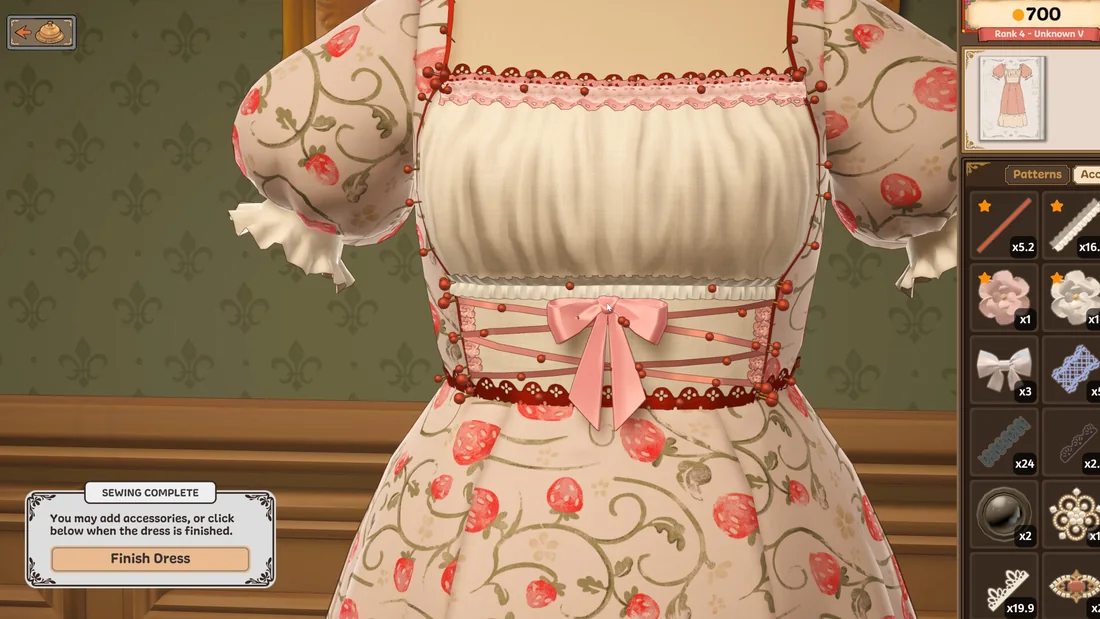
Trim can rescue a plain dress. It cannot rescue a badly cut one. Decoration sits on top of the cut, so it frames a good decision or points at a bad one: lace above a broken print does not hide it.
- One focal point per dress. Busy fabric wants quiet trim; plain fabric can carry a statement.
- Match the trim to the occasion. Lace and heavy appliqué belong on formal commissions; everyday ones want restraint.
- Clutter is the easiest mistake. Three trims fighting for attention read as noise from across the room.
With over 350 accessories in the full game, restraint is a skill worth learning.
Reading the Customer Before You Sew
Every customer arrives with an occasion, a taste and a reaction, and there is a real scoring surface behind that: a commission's Requirements box names attributes with numbers - one official screenshot reads Quality 70, Flowers 60, Cute 30, Romantic 45 - and the fabric shop shows the same scale as commission limits. Hand-in gives you coin and reputation, and the customer card shows a star rating. How the stars are calculated has never been published. What you get is a face.
A brief is three things: the event, what the client likes, and how closely your fabric and decoration match what they asked for. Designing before you know all three is the most reliable way to waste a bolt. The Dressmaker customer preferences page covers how to read a request, and how to miss on purpose. Design in the sketchbook first, from what your shop stocks.
Coin, Reputation and Which Bolt to Spend
Early on, sew practice dresses in the cheapest cloth that fits the brief. The lesson you are buying is layout and seam order, and it costs the same in cheap cotton as it does in silk. Save expensive bolts for commissions that pay well, or for a dress you sell off the rack from your shop window.
Two numbers move when you hand a dress in: coin and reputation. Coin buys the next bolt; reputation is what the town remembers. A cheap dress sewn well beats an expensive dress sewn badly, and the developers have not published fabric prices, coin amounts or a reputation table.
Troubleshooting: When the Dress Looks Wrong
Run down this list before you blame the sewing:
- The silhouette sags or stands away. The fabric is fighting the shape. Change the bolt, not the pattern.
- The print looks broken. The repeat is larger than the panel; move it to a bigger piece.
- Stripes step at a seam. A layout fault, and it cannot be fixed after cutting.
- One panel looks like a different color. Check the nap; reverse-cut velvet reads as two dyes.
- The hem waves. Usually a bias panel beside straight-grain ones.
- It looks fussy rather than finished. Take one trim off, then another.
- The dress is fine and the customer is unhappy. Re-read the brief; the problem is usually the occasion, and customer preferences covers it.
Dressmaker rewards the habits a real workroom rewards: plan the cut, respect the grain, spend your cloth where it shows, keep the decoration honest. The Dressmaker wiki keeps the reference tables together, the dressmaker game homepage covers the release and the free prototype, and games like Dressmaker is the next stop.